Build your own NAS using FreeNAS
Worrying about a bunch of external drives, on your floor that you inadvertently stumble upon and kick? Tired of wasting time looking for data, not knowing in which drive it resides? Tired of having to transport these drives from computer instead of having them accessible to all computers all the time? Have you been thinking of buying a NAS but the available choices do not meet your criteria for Data Safety, Space Utilization, Cooling, etc? or, if they do they are not on your price range? If you answered yes to any of those questions or you are looking for an entertaining project, then this article is definitely for you. This article will teach you how to build your own RAID 5, 1 Terabyte NAS (Network Attached Storage) using very reliable and inexpensive components.
Note: Before we start the project. If you are still trying to decide between Openfiler and FreeNAS, read my article: Openfiler Vs. FreeNAS.
Components:
- FreeNAS (Monowall, FreeBSD based NAS software)
- PIII motherboard (Intel Chipset)
- PNY CF Card
- CF to IDE adapter
- SEAGATE 320Gb Hard Drive Barracuda drives (4 Units)
- Adaptec 2610SA SATA Raid Card (6 ports, hardware Raid)

First of all let me give you some price figures:
| Component | Origin | Price |
| FreeNAS | Web download, under BSD license | $0 |
| PIII motherboard | Computer Upgrades Leftover | $0 |
| PNY CF 64 MB Card | Ebay (Used) | $3 |
| CF to IDE adapter | Ebay (New) | $3.30 |
| Tower Case and Power Supply | Computer Upgrades Leftover | $0 |
| Sata cables and SATA power adapters | Ebay (New) | $5 |
| Cooling fans | Computer Upgrades Leftover | $0 |
| Four 320GB SATA Seagate Barracuda 16MB Cache 7200rpm Hard Drives | Tiger Direct / New Egg , etc (Some with rebates) @ .23c / Gb combined cost | $276 |
| Adaptec 2610SA 6 port SATA Raid Controller Card | EBay (New) | $82 |
| Shipping for all components | $44 | |
| Total | $402 |
In comparison the least expensive of the Buffalo’s 1TB stations costs $453 (not including shipping, Source: Froogle) and has two 500mb drives inside and is only capable of RAID 0 and RAID 1. RAID 0 which will give you a full 1TB (before formatting) but without any redundancy, so you know what will happen to your data if one of those hard drives happens to fail. RAID 1 will give you redundancy mirroring both drives but will reduce your total capacity from 1TB to 500GB (before formatting). This project will give you 1.2TB before formatting and RAID, it will give you the ability to run RAID 5 which as opposed to RAID 0 will give you redundancy for all your data, which means it is totally safe in case of hard drive failure. In addition, and unlike RAID 1 it will make use of the space a lot more efficiently giving you significantly less overhead. The total capacity after RAID 5 and formatting will be 919GB. It will also have far better cooling capabilities than the Buffalo Station, which is critical for the life of the hard drives.
Why were these particular components chosen for this project?
Simple… Price, Reliability and Features. FreeNAS was chosen for this project because as its name states… its free. In addition it is reliable, stable and there is plenty of support for it on the web. FreeNAS runs solid but you do have to be careful when configuring it. FreeNAS is still in BETA stage and some parts of the configuration can conflict with each other and ruin what you had previously accomplished without warning. You do need to know the order of the configuration steps. However, once it is up and running it is as stable as any other BSD based system. I will give you the right steps you need to follow to configure FreeNAS in this tutorial. To build my NAS I chose a normal Tower case, why? Cooling…. Cooling is critical for data safety, the more heat you have the less your Hard Drives are going to last. In the following picture I placed only two of the four Hard Drives so you can notice the 120mm fan at the front of the case. Other fans were also installed on the back of the case to evacuate accumulated internal heat and provide an appropriate airflow. I chose a 120mm fan so that it covers all four drives. Make sure that the case you choose for your NAS has space for all drives at the same location. Also make sure that there is space between them. Notice the gap between each drive on the picture below. If drives are not on the same location ensure that all of them have proper cooling and consequently that if a separate cooling source is provided, this does not interfere with the airflow inside your case. Air should flow from the front of the case to the back and then out. This arrangement will provide excellent cooling capabilities for your NAS box.

As you can see, for this project I’ve chosen a CF Card with a CF to IDE adapter as my main boot drive. The advantage of this is that is that a CF Card is significantly more reliable than a Hard Drive since it is solid state, its basically memory, it does not have any moving components inside that are prone to failure. This CF Card is mounted on a CF to IDE adapter which as is name states converts the CF card into an IDE Drive, it uses the regular IDE ribbon Cable and the small power plugs that are usually used to power floppy drives. I addition, being a memory card, it will consume very little power as well as generate practically no additional heat inside the case. And finally, it is dirt cheap you can basically get both the card and the adapter for $10 including shipping. That is if you do your research on eBay and are willing to wait the two weeks it takes for the adapter to be shipped from Hong Kong. You can also get them from a national reseller buy they will cost you a bit more. I’ve read some postings on the web of people saying, why waste a whole computer by using it excusively for a NAS when it can run other utilities as well. I beg to differ… fist if all, what are you going to use an old PIII or a PII for nowadays? And even if you had a good use for it, why are you going to waste hard drive space installing an operating system on your cluster? Either that or purchase another hard drive for your project and we already went trough the advantages of a CF card over a regular Hard Drive. The jewel of this project is definitely the Adaptec 2610SA RAID Card. This card was made by Adaptec to run on Dell servers. This is a true Hardware RAID card, which makes it totally software independent and guaranteed to work with almost any operating system on the face of the planet, since you do not have to install any software to drive the RAID cluster. In addition it is capable of RAID 0, 1 and 5. As some of you might know, software RAID’s restoring procedure can be sometimes difficult, hardware RAID is straightforward and pain free. Moreover, since this card does not depend on the operating system, you do not have to worry about the operating system becoming corrupt, if the operating system stops working you can just reload it, it will see your drive with all your data without much configuration. Don’t worry about the large PCI connector, it will fit well on a regular PCI slot, the reason why it is so large is because you can also use it in 64bit PCI slots. I purchased this card new on eBay for around $82, be sure to get the one made for DELL and not the one made for HP, there are many reports on forums stating that this card will not work with FreeNAS.
Procedure to configure RAID 5 on the adaptec 2610SA
STEP 1
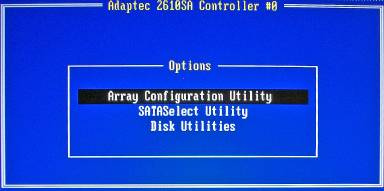
Turn the computer on and hit CTRL-A when you see the following message come up on the screen

STEP 2
Click on SATASelect Utility and then on Controller Configuration
STEP 3
Make Sure everything looks exactly the same as in the following screen:

STEP 4
Go back to the initial screen and click on Array Configuration Utility, then Click on “Create Array”


STEP 5
Press INS button to select all drives and ENTER when done

STEP 6
Next screen should look as the following picture, note that I have chosen to disable WRITE CACHE since having this option enabled makes the array prone to data corruption in the event of a power failure. Notice that the stripe size was left at 256K since this is what Dell recommends for most network environments. In the array label you can basically input whatever name you desire, I chose FreeNAS as my label name.

Hit ENTER when done and the Dell 2610SA RAID Card will start configuring the drives, this process will take many hours. Mine took approximately 10 hours. However, once you begin the process you will get a message telling you that the array is available immediately but performance is degraded due to the Build/Verify process. To check the status of the Build/Verify process go to the Main Menu and click on “MANAGE ARRAY” then hit enter to select the array you just formed and then look under “ARRAY STATUS” it should display a percent completed or “OPTIMAL” when done.
Configuring FreeNAS
FreeNAS is fairly simple to install, just burn the ISO provided in the FreeNAS website, boot the NAS server with it and follow the installation procedure. Once installed, if you happen to get error messages when trying to run it, bear in mind that you need at least 96mb of memory to run FreeNAS. However, this is the minimum that the FreeNAS creators recommend but it is impossible to run a 1Tb Raid 5 box with this amount of memory, it will not even allow you mount the partition. I would recommend 256mb or 512mb. Once we have FreeNAS up and running we are going to Select option 2 “Set LAN IP Address” It will then ask you if you want to set the IP as DHCP, I chose DHCP since this is what I use on my home network, but if you want to have permanent links or shared drives on the client computer you better use a fixed IP. Regardpess if you use a dynamic or static IP, FreeNAS will display this IP above the FreeNAS main menu, in URL format, this is what you are going to input in your web browser to log in remotely to your NAS box.

Example: http://192.168.1.3 Username: admin Pass: freenas Once you log in change the login name and password to something you can remember Next Click on “MANAGE” and add your RAID array to the list of available Hard Drives, you do this by clicking on the round sign with the plus sign in the middle. Once you are done click on the format tab and proceed to format the Array as USF or USF with soft updates, whichever one you prefer. This process will take some time.

Which file system to choose?
The best file system for FreeNAS is actually “UFS with Soft Updates (use 8% space disk)” this is a more advanced and updated version of UFS, I was told by the FreeNAS people that this is the way to go. Since, even if you loose 8% of space, the file system will always be in optimal condition as it does not need to be defragged. Fragmentation in a 1Tb NAS is definitely not something to be overlooked; it can greatly reduce the performance of your NAS. Some people will erroneously tell you that EXT3 is the file system to use, some will even claim that EXT3 is better when recovering data in case of a disaster, but the reality is that the disadvantages far outweigh the advantages, besides we are running a RAID5 array which is already secure enough. EXT3 is partially supported on FreeNAS but is not native to FreeNAS so performance will be greatly reduced. FreeNAS does not even have the option to format in EXT3 it will have to be done with a Linux Live CD and once it is up and running you will not even have the capability of running FSCK (File System Check). Only use EXT3 if you are running FreeNAS with Linux as an operating system because EXT3 is native to Linux, but if you (like me) installed it with the FreeNAS ISO cd then you have FreeNAS running in FreeBSD and UFS is the file sytem to use. Once you have chosen the file system, format it and its ready to go.

Hi,
When I try to run Freenas 8.01 it appears the following “error” message. Anyone knows to fix it?
http://imageshack.us/photo/my-images/202/20111103105823.jpg/
My network adapter is Intel gigabyte 100/1000 MBits/s ( Gibabyte Ethernet Intel 82579V ) and mb Intel DH61WW.
Thanks in advance
Hi Steve:
RAID5 is definitely not recommended on a software raid, you can do it but performance is going to definitely suffer. Software raid is more for RAID0 and RAID1…. As we know, with RAID0… good luck if you loose one of the drives and RAID1 the space is limited. When I built this project I had this running on a P3 motherboard which died on me. I just swapped it with a P4 motherboard, reloaded freenas on my CF card, inserted the RAID card and mounted my RAID with absolutely no configuring, since all the configuration was stored inside the card. Hardware RAID does have its disadvantages 1) Costly 2) Closed source firmware, so you are at the mercy of the company for firmware updates. But I’ll take it over software RAID any time. I respect your opinion but I do not agree with it.
Anyone thinking of building something like this, I can’t urge you enough to use software RAID in Linux. It’s really not any more difficult to set up and you might have to follow a howto to replace a failed drive but everyone I’ve spoken with (3 other guys) that has had a hardware array has had problems rebuilding the array after a failure that resulted in data loss. We’re all using Linux software RAID now (8TB array, two 6TB arrays, and a 4TB array). We’ve all had to replace at least one drive (I’ve swapped four over time).
That last bit is a point about hard drives that I can’t underscore enough, and also re-enforces using software RAID. Hard drives are junk now, even with good cooling (sub 30 C) expect to replace a drive every couple of years at least. Be proactive and use SMART. It’s easy to do but many hardware RAID controllers don’t give you access to the SMART data from the drives whereas with software RAID it’s always available. Use SMART for two purposes: check the drive temperature and see if the drive has started to fail. Make sure the drive temps are udner 35 C and if possible get them under 30 C. Ignore the “health status” of the drive, instead check the Reallocated Sector Count, Pending Sectors, and Offline Uncorrectable sectors. These counts should always be zero. When they start to increase it’s time to order that new drive because while the drive might have a year left in it, it probably has a month left in it at most. Be safe and just swap that drive out ASAP.
Also, if that controller fails, you’ll need to find another one of the same brand/type to use your array. With the Linux software solution you can slap those drives in any computer and boot a Linux CD and your data is accessible. And it works the same for everyone so you can get tons of info and help off the internet.
Think all this is a problem with “cheap” hardware raid controllers? I watched a corporate system on which no expense was spared lose TBs of data thanks to a hardware raid controller. Not a cheap component in that system. Was SMART monitored correctly? No, not supported. Did they receive array failure alerts early? No, system was too confusing so it turned out it was improperly configured. $20K of a hard drive recovery facility and a week later and some of the data was back, but I can’t afford that at home.
Go with something that is well understood and has a huge user base. Something that has email alerts for both SMART and RAID status. Something were those alerts are easy to test to make sure they go through. Something that has tons of support. Something where you can check drive temps or generally easily check up on the array anytime. And script it as well.
Also, is software RAID slow? I can max the ethernet port and only busy one of my cores.
I almost never post on random places on the internet but I hate to see people lose their data. It’s always tragic. Good luck.
Moggsie31
Thanks for finding that, I’ve always wondered myself what was the biggest drive the card would support. According the the thread its 750GB and you need to upgrade the firmware on the card. Now, the thread is from 2009, those were the biggest hard drives back then, there might be a newer firmware.
Hi Moggsie31
“Limited Success”?? let me know where are you getting stuck. You can actually build the raid 5 with 3 drives, but 4 will give you more space.
Update….
Anyone thinking of using large drives with the Dell 2610, please refer to this first…..
http://en.community.dell.com/support-forums/servers/f/956/t/19264487.aspx
Let The Buyer Beware !
…Of course I’m open to ideas here
Well, I bit the bullet at last and tried my hand at this project.
Limited success so far ( trying to build the “array” with one drive before I commit to buying any more !) , but others might find help here….
http://support.dell.com/support/edocs/storage/RAID/CERCbest.pdf
Thanks for the great article anyways Pablo !
Hi Max:
I totally differ from your opinion. Let me give you an example: When you buy a 600W power supply that means this PSU can deliver a maximum of 600W. So if your motherboard plus hard drives consume 100W then your power supply will get 100W (plus a negligible cost of transformation ~10%) from the power plug.
1) Summarizing what I just said, the computer draws the most amount of power when it needs it.
2) This is running on an old single core PIII wich draws very little power compared to today’s computers. An old PIII which cost me $0 and which otherwise would go to waste.
3) The main hard drive is a CF-Card which draws negligible power.
4) Most of the power is being taken by the hard drives but that will also be the case with any standalone RAID unit.
5) When it is not being used it is asleep, freenas has pretty decent power settings.
6) And last… you do not have to have this running all the time, I certainly do not. I just turn it on to backup my computer.
Why waste the power consumption and processing power of a full box on simple NAS tasks. Think about the running cost abefore falling into a project like this. A simple dedicated NAS drive might well be a better solution.
If you really must use a full box then let it work for you and get something out of its running cost. A simple XP server on a home network is much more exciting. There are limitless opportunities to let the server handle download work and take load off the other PC’s on the network.
Can anyone suggest a reasonably priced SATA RAID 5 controller that can break the 1TB barrier? In this day and age 1TB isn’t that great an amount of disk.
I repurposed an old Dell desktop as a test FreeNAS server a while ago- worked great, but I outgrew the disk, so I decided to upgrade it with CompactFlash and the Adaptec controller you mentioned here. Array is formatting as I write this, but I have some comments:
1. FreeNAS 0.7.2 (latest stable as of March 2011) would not install on a 64 MB Compact flash. I had to use a 128 MB Card.
2. I used three 1.0 TB disks. The array controller cannot create a volume over 1.818 TB in size.
3. The RAID card is only rated at 1.5 Gb/s, and my drives are 3.0 Gb/s, so I had to jumper them into 1.5 G mode.
It will be nice to have the added space!
If one if the drives are corrupted. How would you recover the RAID with the setup that you have here?
Would you start the recovery process using FREENAS? or from the RAID controller software itself? or do you need some RAID recovery software (e.g. RAID Reconstructor)?
Could you provide detailed steps on the recovery process? Thanks.
I provide FreeNAS as a standalone headless storage solution. I do not use RAID. I just plug the HDD’s of varying capacities usually 4 or 2 (I buy a motherboard with 4 SATA ports and earlier they used to come with at least one PATA port on which I can connect 2 older IDE disks additionally) 1TB drives. Install FreeNAS on the primary harddisk usually on a 50 GB partition if it is a 1TB drive. Provide access to Windows PC’s. Just bind the NAS to either a Samba PDC or AD depending on what is available. Been running for the last 4 yrs. One of the disks in one of the solutions I provided failed. I just got it replaced under warranty (5 yr) and plugged it right back and added it again. Also I must mention that in situ upgrades of FreeNAS are a breeze.
I built a freeNAS following these instructions about 2 years ago on a dell dimension 2300 box –
mostly to store my families itunes content. I put it in my network closet and basically forgot
about it due to the fact it has been workling flawlessly. I had configured 4 500mb WD disk drives
as raid5. Unfortunately, I lost one of the hard drives and lost power during the automated rebuild process, ultimately leading up to loss of the raid itself. Needless to say, my family is not quite pleased with my technical prowesness. The only reason why I bring this point up, is to reccomend that you back up your data. Raid is not failsafe. One more point. Be careful changing the configuration settings of the 2610.
It could trigger a rebuild/verify – which on my machine runs for abour 72 hours.
Can anybody tell me if you can install FreeNas on laptop? if so, can anyone explain me why I keep on getting error message saying that ” can’t found gmirror”? any input will be appreciated. Thank you.
Hello to all i mount a freenas server and i have som dudes
1- raid 5 in case a HD fail how reconstruct he data of the other HD to this in freenas? other?
2- i run freenas in usb memory of 4gb now any problem?
hi Pablo, I’ve spent the past few weeks sourcing the components for this project and re-reading your instructions. But I have to confess I am confused about one of the main features, doh! ie the installation on a compact flash card. My card, like yours is 64mb, but you state that a FreeNAS install needs upwards of 256mb. So, I deduce that the installation is in RAM, so just when is the CF card used? If as I suspect it is to remember the configuration, when is this choice actually set, and what if there is a power cut causing the RAM to be wiped, do you have to reinstall FreeNAS from the cd again? perhaps I’m too much of a novice for this, should it all be obvious to me? thanks for your time, mannock
Thank you for the great article.
I think i am going to build a system similar to this.
But before i do i have 2 questions.
What is the transfer speed on a system like this?
and is it possible for other devices to acces the harddrives through the USB ports?
im asking since i need a NAS or something that i can transfer movies, music, and photos from my PC to my Asus O-play multimediabox.
The o-play only has 10/100Mbit network and i dont think it can stream blu-ray movies through that so i need it to connect through the USB port.
Hi Im having some problems with my Adaptec 2610SA Raid Card on a rig that I’m putting together. The Raid Card is detecting the 3 Hard drives I have with the led indicators lights on the card but when it is plugged into the pci slot of my mobo it won’t boot, everthing will spin up but no signal will be broadcast. If I take the card out everything works just fine, it loads Freenas right up.
ASUS P4PE motherboard
Intel Pentium 4 cpu
1gb ram
128mb CF to Ide
3tb Seagate HD
Really at a loss, If anyone can help that would much appreciated. Thanks
Hi Mannok. There is not way you can get away from the text based configuration for the installation, since you have to setup the RAID card. The pictures of the text based menu you see on my article come from the configuration stored on a chip inside the RAID card. These chips usually do not have enough storage capability to store a full GUI interface. Then comes the FreeNAS installation which is also text based, but it is really simple as well. Don’t be afraid of it, follow my article and you will be fine.
thanks for your answer Pablo. I was a bit vague with my question though, now I have read it again, I meant how do you begin the setup and see the bios screen unless you have a graphical output, or can the lan cable work right from first boot up? or perhaps you use a graphics card to start with then once it’s all up and running ok, remove it and use the browser?
Hi Mannok, the answer is both, you can connect a monitor to it, or manage it using the web interface through the lan, which is actually more user friendly because it has a GUI. I do explain this on the article…. “FreeNAS will display this IP above the FreeNAS main menu, in URL format, this is what you are going to input in your web browser to log in remotely to your NAS box.”
sorry for my ignorance, but I haven’t seen any mention of what people use for the user interface (I think that’s the right term) do you need a graphics card installed or can it all be done using the lan connection? I would like to build a nas box using as few components as possible to keep heat down and reliability up.
Oooo o_0 yeah …i’ve tried it , used it…GREAT!
on an old Pentium III class PC ,even on Atom based motherboard where you can benefit from DDR2 memmory witch the chipset uses, just one PCI slot dow, where you can choose between Gb lan card or SATA raid card depending on what the FreeNAS system focuses on- network performance or storage capcity.Can’t have it all if you want a low power consumption box (like my torrent/backup/share box) :-P.
Havent tried LAGG on some fullfeatured ATX motherbaord and Gpbs lan cards , but that’s up coming next…
got some problems with ddns on , i think, 0.7.1 version of FreeNAS,aaa grrr SAMBA & Windows VISTA,
but everything else is up and running for quite some time…
even got a subsonic web-based media streamer working on FreeNAS box.
I stumbled upon your article looking for “what’s new around” FreeNAS and I can say it’s a good one..
keep up with good work …
best regard from Serbia
Zagorchillo
Nice article, hard to find an exact howto these days for a budget NAS!
jimb:
What kind of card do you have? is it a real raid or a fake raid card? If it is a real RAID card you basically have two choices.
1) Backup everything to another location then install all drives at once and recreate the array.
2) Install a single drive at a time and rebuild the array each time. this will take longer, but if you do not have a storage large enough to back up the data, this would be the way to go.
I would still recommend option #1 just in case something goes wrong.
Nice to see there are some recent activity on this topic.
I am using a Dell SC440/FreeNAS/4-1TB drives, but I want to upgrade my drives to 2TB drives. From as FreeNAS point of view, If I want to upgrade the HDDs, is it as simple as removing one of the 1TB drives and then plugging in a 2TB drive and letting the system rebuild itself?
It seems like most of the RAID controllers on the hardware compatibility list are older controllers with SATA 150 – the older/slower 1st generation of SATA.
I was wondering if I will build a Raid 5 array with newer SATA300 drives, such as the Hitachi HDS7210750CLA332 – which are 750GB 32MB buffer – will the controller being SATA150 or SATA300 make a real difference?
I am still shopping around for the controller – as this will be in my home/lab – not on a real production environment.
Thanks
Michael I. Raveh
MIR Information Technology, Inc.
Just downloaded FreeNAS, and its awesome! Just put it on a 2 gHz PC with a PCI SATA controller and a 120 gig sata just for testing purposes.
Everything came up just fine and found the SATA drive and all.
Next thing is to order my 1 TB drives.
1) RAID 5 requires Min 3 Drives to setup, card noted here will max at all 6 Drives but still usable as RAID 5…
1a) As noted only 1 drive in any RAID 5 can die without data loss due to the Strip Set configuration written across all drives in the RAID 5 Array
1b) RAID 5 Capacity: # drives x size – Size of 1 Drive (Example: 4x 1T Drives would = 3T RAID 5 – Before Format)
2) Limitations on this Adapter will prevent using larger than 2Gb Array Size, suggest 3x Raid 1 Mirrors for 3T total total size… Remember any HW Array will be far faster with less overhead under RAID 1 than RAID 5 where strip set must be written across each drive in the Array.
3) Nice Setup if you want speed here the only way to get faster would be move to SAS or U320 SCSI, this is what it is a “HOME” or at best Basic NAS Storage System so you aren’t writing DB Data to it by any means but works great for file backup/sharing.
Zooman is correct. The reliability of a RAID 5 when using large drives, like 500GB or 1TB drives is a lot lower. Yes if one drive fails you don’t lose any data, and can rebuild after replacing the failed drive, but if a drive dies during that rebuild your data is gone. The rebuild on a a 3x1TB RAID 5 array is usually in the neighborhood of 3 days, and a lot can go wrong in 3 days. With larger arrays I’d much rather have RAID 6 with a hot spare which can tolerate the loss of up to 2 drives.